Discovering the Area Formula for Circles
Lesson 2 of 2
7th grade
60–75 minutes
Description
Discover the area formula of circles by separating into congruent shapes and using their understanding of other polygons.
- Circular objects (brought in by students)
- Calculators
- Scissors
- Compasses
- Rulers
- Some students may need pre-cut pieces for wedges of the circles or assistance organizing the wedges in the shape of parallelograms.
- Centimeter grid paper
- Blank copy paper
- Fraction Circle Activity Sheet
- Area of Circles Activity Sheet
Introduce
As an Introductory activity, distribute the Fraction Circles Activity Sheet (download from Materials section) to student pairs. Have students highlight each part of a circle they know and recognize using a different color. Be sure students are identifying the radius and the diameter. In particular, students should realize that d = 2r. Students should be able to calculate radius from diameter and diameter from radius. Monitor student progress to check for any misconceptions.
Teacher Note:
Strategy for differentiation:
If necessary, give some students a word bank with the vocabulary: circumference, diameter, and radius and discuss parts of a circle with students.
Explore
Give students an opportunity to estimate the area of the circular objects that they have brought to class.
Working in small groups and using the Area of Circles Activity Sheet (download from Materials section), students should individually complete the first two columns:
- Description of the object
- Their estimate for the area of the object
Note: The other two columns will be completed later in the lesson.
Teacher Note:
Strategy for differentiation: Another method would be to have students estimate the area of circles using centimeter grid transparencies and cut out circles. Cut out circles of various sizes and give a set to each small group of students along with centimeter grid paper or centimeter grid paper transparency. Students would be able to trace the circles using pencils or dry erase markers and approximate the area of each circle by counting the number of squares.
Students may use any method they like to estimate the area of their objects.
Teacher Notes:
Some possible methods include:
- Students can trace the shape of their object on a piece of centimeter grid paper and count how many square centimeters make up the total area of the circle.
- Students can divide the circle into wedges by drawing radii. They can approximate the area of each wedge using the triangle formula. (This method is similar to a method used by Archimedes, and it is the method that will be used later in this lesson. For a connection to mathematical history, you may want to include a brief overview of Archimedes and his method for calculating the area of a circle.)
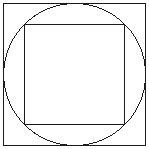
- Students can inscribe the circle in a square, hexagon, or some other polygon. Then, the same shape could be inscribed within the circle. Students could determine the area of the inscribed and circumscribed shapes to get lower and upper estimates, respectively. (You may need to provide a sample drawing of this method, like the one shown below.)
- After students have estimated the area of several objects using multiple methods, have students share their methods for calculating area in small groups or as a whole class. It might be useful to use the jigsaw cooperative learning structure (group members disperse to other groups) to share methods for finding area across groups.
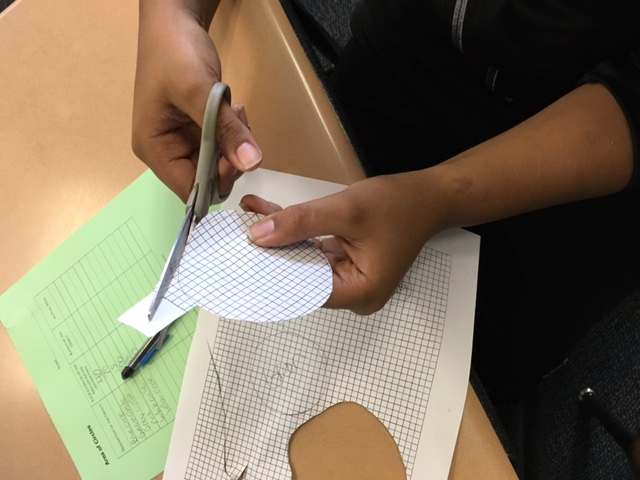
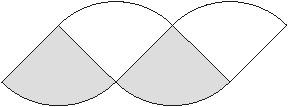
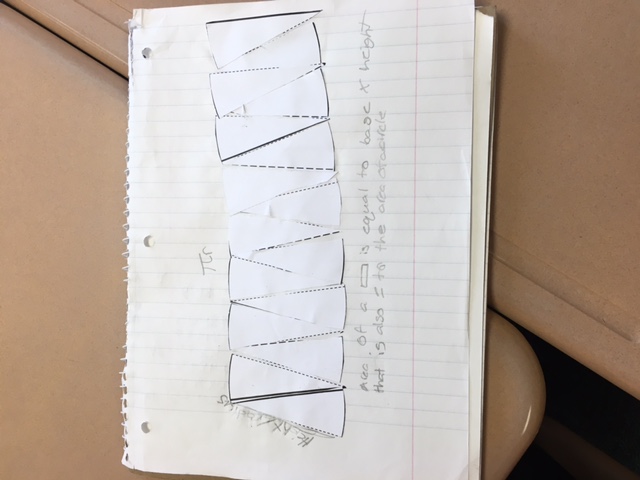
In pairs or small student groups, have students cut the circle from the sheet and divide it into four wedges. (This can be done if students cut only along the bold, solid, black lines.) Then, have students arrange the shapes so that the points of the wedges alternately point up and down, as shown below:
Different parts of the circle (radius and circumference) should be highlighted in a color from the Introductory Activity.
Students will likely suggest that the shape is unfamiliar.
Then, have students divide each wedge into two thinner wedges so that there are eight wedges total. (This can be done if students cut only along the longer and thicker dashed lines.) Have students try and arrange the smaller wedges into a polygon they are familiar with. Students may take some time in determining the polygon. Allow them to think about and engage in productive struggle with this part of the activity.
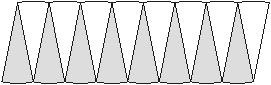
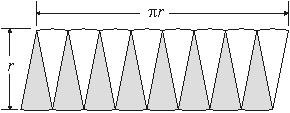
Finally, have students divide each wedge into two thinner wedges so that there are sixteen wedges total. (This can be done if students cut along all of the dashed lines.) Allow students to arrange the wedges so that they alternately point up and down, as shown below:
Teacher Note:
- When arranged in this way, do the pieces look like any shape you know? (SMP 7) In the beginning students may think it looks like a “wave” and not a polygon they can easily recognize. Encourage students to think about the shape of a polygon, like a parallelogram.
- When the circle is divided into wedges and arranged in this way, does it look like another shape you know? (SMP 7) [Ans: parallelogram]
Facilitate the discussion so students realize the shape currently resembles a parallelogram, but as it is continually divided, it will more closely resemble a rectangle.
You may wish to continue this activity by having students divide the wedges even further.
Students should realize that the length of the rectangle is equal to half the circumference of the circle, or πr. Additionally, students should recognize that the height of this rectangle is equal to the radius of the circle, r.
Have students try and generate a formula for area of this new rectangle formed by the pieces of the circle. Consequently, the area of this rectangle is πr × r = πr2. Because this rectangle is equal in area to the original circle, this activity gives the area formula for a circle:
A = πr2
The figure below shows how the dimensions lead to the area formula.
Have a class discussion with students explaining that total area is almost always an approximation.
Teacher Notes:
- What do you think would happen if we kept dividing the wedges and arranging them like this? (SMP 7)[Ans: The picture will approach a rectangle.]
Using the highlighted circle from the Introductory Activity will help students to more easily identify the dimensions of the newly formed rectangle.
- What are the dimensions of the rectangle that is formed? (SMP 1) The length of the rectangle is equal to half the circumference of the circle, or πr. The height of the rectangle is equal to the radius of the circle r.
Watch for possible misconceptions:
Difficulty using the variables C, d, and r; and students not recognizing that the base of the parallelogram is only ½ of the circumference.
- If we have to approximate pi, because it is an irrational number, what does that mean for the area of any circle we calculate? Because the value of π can only be approximated, any time the area of a circle is stated without the π symbul, it must be an approximation. For instance, a circle with radius of 5 inches has an exact area of 25π in.2 and an approximate area of 78.54 in2.
Synthesize
When returning to large group discussion, verify students understand and can apply the appropriate formula for area of a circle A = πr2
Ask students to return to the objects they estimated the area of at the beginning of class. Refer to the Apple Pi Activity Sheets from the Circumference of Circles Lesson, and have students calculate the radius of each circle using the diameter. Then, students should use the formula just discovered, calculate the actual area of each object, and record the area in the fourth column.
Have a class discussion about similarities and differences of the areas of the various circles.
Teacher Notes:
- How did we use the properties of a parallelogram to discover the area formula for circles?. (SMP 8) By converting a circle to a parallelogram, the height and the base of the parallelogram correspond to the radius and half the circumference of the circle. Therefore, we can use the formula for the area of a parallelogram to determine the area of the circle.
The class should also compare their original estimates with the actual measurements. On their recording sheets, have them highlight their objects' estimates that were very close to their actual. At the bottom of the recording sheet, students should explain why they thought some estimates were closer than others.
Assessment (optional)
Students can solve the following practice problems:
- The radar screens used by air traffic controllers are circular. If the radius of the circle is 12 centimeters, what is the total area of the screen? [A = πr2, so the area of the radar screen is approximately 3.14 × 122 ≈ 452.16 cm2.]
- A farmer's irrigation system has a center pivot (rotates) with a system length of 600 feet. What area does this system cover? [A = πr2, so the area of the circle is 3.14 x 6002 ≈ 1,130,400 sq. ft.
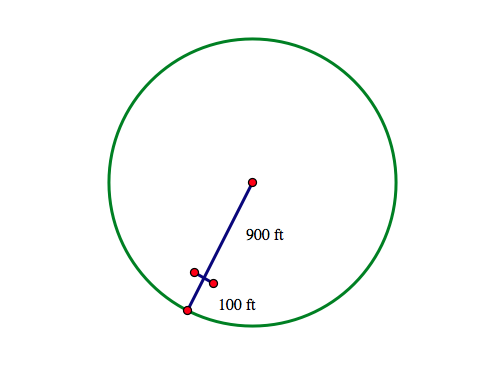
- If a farmer's irrigation system has a center pivot with a system length of 900 feet and the end sprayer sprays 100 feet beyond, what is the area covered by the system? [A = πr2, so the area of the circle is 3.14 x (900 + 100)2 ≈ 3,140,000 sq. ft. See diagram below]
- Working in pairs or groups, have students locate manhole covers and other circular objects on the school grounds. Have students measure the diameter of these circular objects and then determine the area.
Extension (optional)
Activity 1:
Do the following lesson: The Great Cookie Dilemma
In this lesson, students explore two different methods for dividing the area of a circle in half, one of which uses concentric circles. The first assumption that many students make is that half of the radius will yield a circle with half the area. This is not true, and it surprises students. In this lesson, students investigate the optimal radius length to divide the area of a circle evenly between an inner circle and an outer ring.
Activity 2:
Possible journal entry or small group task:
Given the circumference of a circular object, how can you identify the area of this object? Justify your answers with mathematical thinking.
Given area of a circular object, how can you identify the circumference of this object? Justify your answers with mathematical thinking.
Teacher Reflection
- How did you connect the visual model to the algebraic formula for area of a circle?
- How were you able to get students to explain the mathematical basis for deriving the area of a circle?
- In this lesson, how were students able to explain why the formula for area of a circle works to solve for area of all circles?
Leave your thoughts in the comments below.